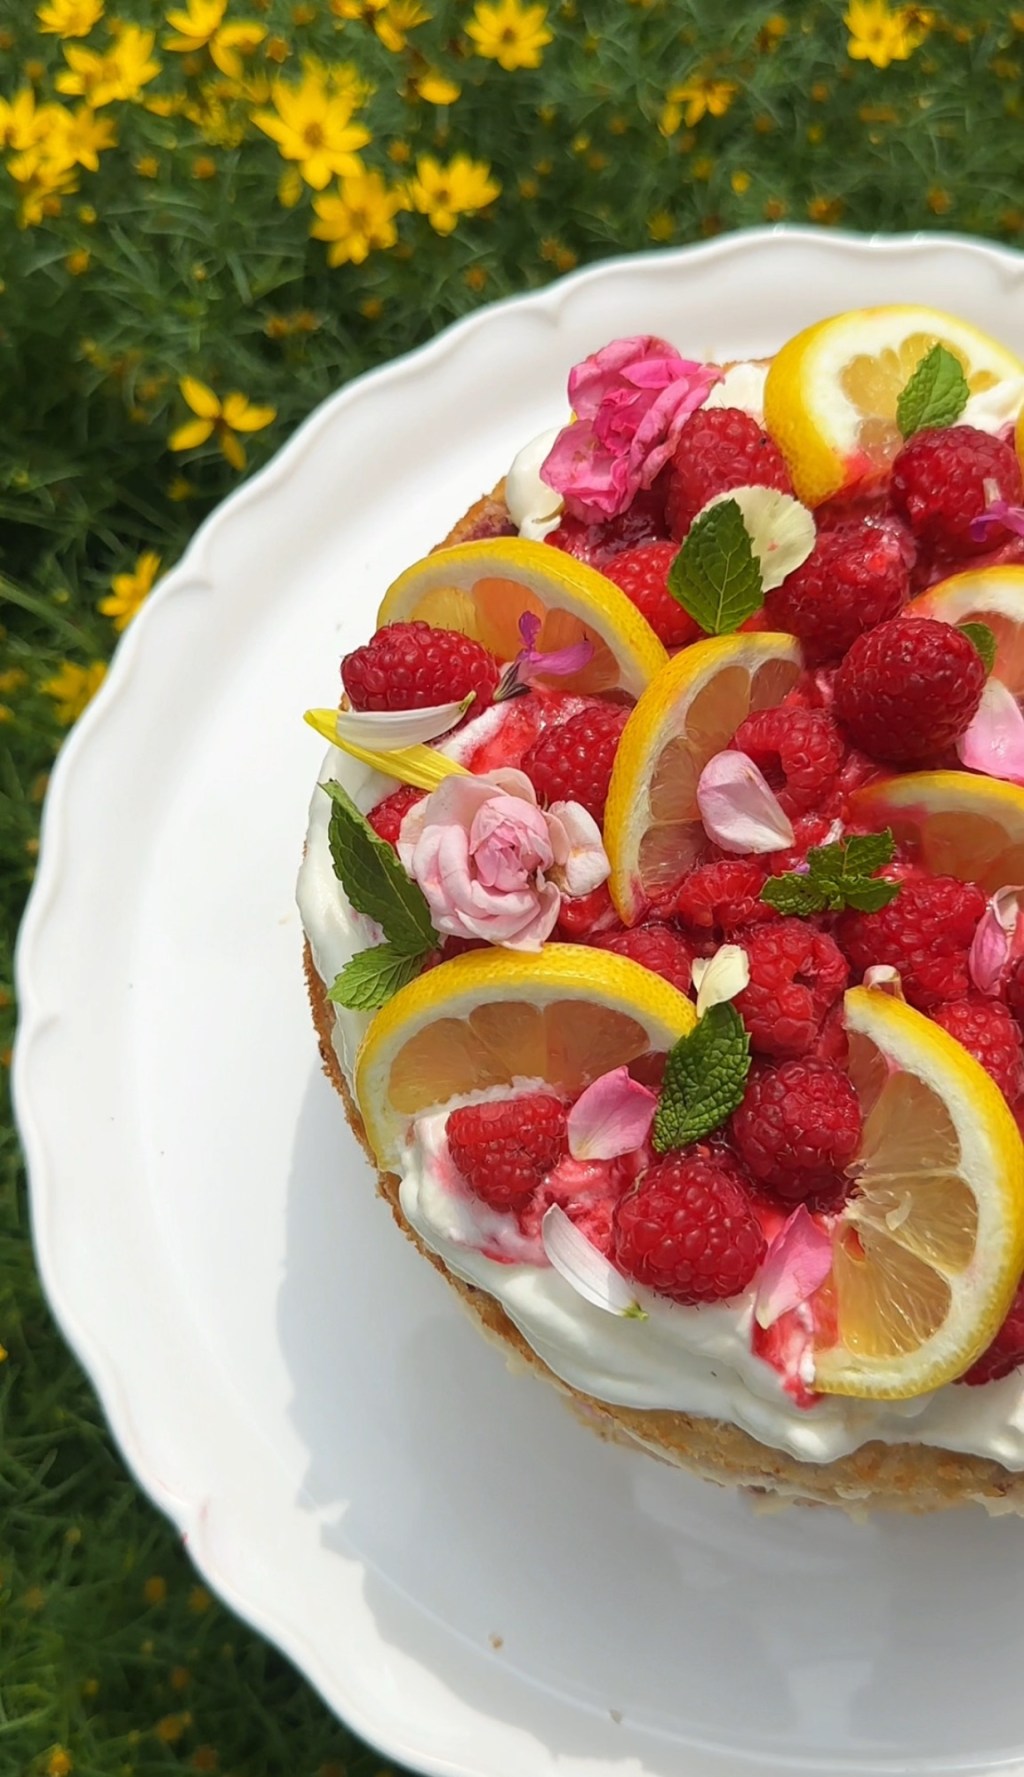

If I could turn a summer day into a cake, it would taste exactly like this: soft lime-scented layers, bursts of juicy raspberries, and a cloud-like mascarpone frosting that feels like a warm hug. This cake is bright, fresh, and indulgent in all the right ways—and yes, it tastes just as dreamy as it looks.
It’s one of those bakes that looks and tastes like it took hours—but in reality, it’s surprisingly simple. Whether you’re celebrating something special or just want to fill your kitchen with sunshine, this recipe has become one of my go-tos, and I think it’s about to become one of yours too.
Let’s break it all down: the ingredients, why they work, how to bake it just right, and all the little tips that make a homemade cake feel like a bakery masterpiece.
Let’s bake!
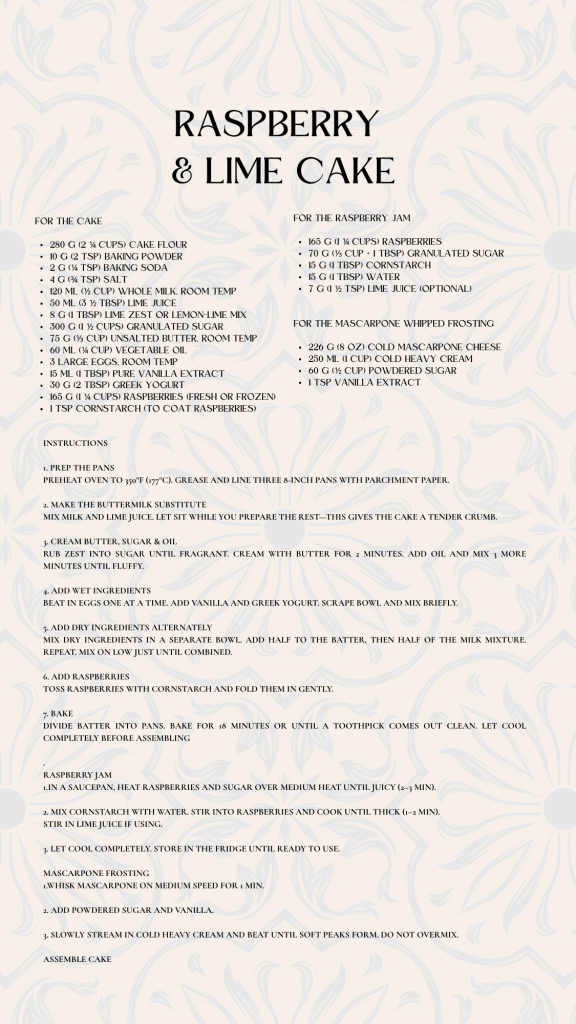
Raspberry lime Cake ingredients
Since I’m very awesome and some of you prefer the imperial system rather than the metric, here’s both. I always recommend the metric system for accurate and more consistent results.
⚖️ Raspberry Cake Metric (Grams + ml) Version
🎂 Raspberry cake
- 280 g cake flour
- 25 g baking powder
- 2 g baking soda
- 4 g salt
- 120 ml whole milk
- 50 ml fresh lime juice
- 8 g lime or lemon-lime zest or a mix of both
- 75 g unsalted butter, softened
- 300 g granulated sugar
- 60 ml vegetable oil
- 3 large eggs
- 15 ml vanilla extract
- 30 g Greek yogurt
- 165 g raspberries
- 1 tsp cornstarch (for tossing raspberries)
✨ Mascarpone Whipped Frosting
- 226g mascarpone cheese
- 250ml heavy cream
- 60g powdered sugar
- 7 ml imitation vanilla
Note: I felt my cake needed more frosting so I highly recommend you doble the recipe.
🍒 Raspberry Jam
- 165 g Raspberries
- 70 g Granulated Sugar
- 15 g corn starch
- 15 g water
- 7 g Lime juice (optional)
Note: If 25g baking powder seems high, that’s not a typo—it creates a high rise in shallow layers and balances the acidity in this recipe.
🍓 Raspberry Cake Imperial ( Cups + tbs ) Version
🍥 Raspberry Cake
- 2¼ cups + 2 Tbsp cake flour
- 5 tsp baking powder
- ½ tsp baking soda
- ¾ tsp salt
- ½ cup whole milk
- 3 Tbsp fresh lime juice
- 1 Tbsp citrus zest
- ⅓ cup unsalted butter, softened
- 1½ cups granulated sugar
- ¼ cup vegetable oil
- 3 large eggs
- 1 Tbsp vanilla extract
- 2 Tbsp Greek yogurt
- 1¼ cups raspberries
- 1 tsp cornstarch (for tossing raspberries)
✨ Mascarpone whipped frosting
- 1 cup/8oz mascarpone cheese
- 1 cup heavy cream
- 1/2 cup powdered sugar
- 1/2 tbs imitation vanilla
🍇 Raspberry Jam
- 1 ⅓ cups raspberries
- ⅓ cup + 1 tsp granulated sugar
- 1 Tbsp + 1 tsp cornstarch
- 1 Tbsp water
- 1½ tsp lime juice (optional)
🥣 Why These Ingredients Work
1. Cake flour: Low protein = soft crumb. This is what gives that “bakery texture” everyone loves.
2. Oil + butter: Butter for flavor, oil for moisture. The combo makes the cake tender but rich.
3. Citrus juice + zest: Lime juice reacts with the baking powder to give a delicate rise. The zest brings the aroma—don’t skip it.
4. Greek yogurt: Adds moisture, a subtle tang, and helps with the cake’s structure.
5. Raspberries: The fruit adds bursts of tart sweetness. Tossing them in cornstarch keeps them from sinking and bleeding into the batter.
Video with steps:
📌 Step-by-Step Instructions
Step 1: Preheat and Prepare Your Pans
Preheat your oven to 350°F (177°C). Grease three 8-inch cake pans and line the bottoms with parchment paper. Lightly dust the sides with flour if desired. This helps the layers release easily and keeps the texture even.
Step 2: Make lime-milk mixture.
In a small bowl or measuring cup, combine the milk and lime juice. Let it rest for 5 minutes.
Step 3: Mix the Dry Ingredients
In a medium bowl, sift and whisk together the cake flour, baking powder, baking soda, and salt. Set aside.
💡 Tip: Sifting cake flour helps avoid clumps and ensures a smooth, tender crumb.
Step 4: Make Lime Sugar
In the bowl of a stand mixer (or large bowl with a hand mixer), combine the sugar and lime zest. Rub them together with your fingers or paddle on low speed for 1 minute. This releases essential oils from the zest and infuses the sugar with citrus flavor.
Step 5: Cream Butter + Oil
Add the softened butter to your lime sugar and beat on medium speed for 2–3 minutes, until pale and fluffy. Scrape down the sides.
Add the oil and beat for another 2–3 minutes. The texture should look silky and whipped. This step gives your cake structure and lightness.
💡 Tip: Oil keeps cakes moist longer than butter alone.
Step 6: Add the Eggs
With the mixer on low, add the eggs one at a time, mixing well after each. Scrape down the bowl again. If you’re liking this recipe, don’t forget to follow me on my social media, I would love to see you there dearest.
Add the vanilla and Greek yogurt and mix for about 1 minute. The mixture might look slightly curdled—that’s totally normal. When you add the flour, the batter will balance again.
Step 7: Alternate Wet and Dry
With the mixer on low, add half the dry ingredients, followed by half the milk mixture. Repeat once more. Mix just until everything is incorporated. Don’t overmix.
💡 Overmixing at this stage can make the cake tough or sink in the middle.
Step 8: Add the Raspberries
Toss the raspberries in 1 tsp cornstarch—this helps them hold their shape and prevents sinking.
Gently fold them into the batter with a spatula. Try not to break them.
Step 9: Bake
Divide the batter evenly between your three prepared pans. Smooth the tops.
Bake at 350°F (177°C) for about 18 minutes, or until a toothpick inserted into the center comes out with a few moist crumbs.
💡 Don’t wait for a totally clean toothpick—overbaking dries out your layers.
Cool in pans for 30 minutes, then turn out onto a wire rack to cool completely before frosting or cover the pans with foil and let cool overnight.
🧁 Make the Mascarpone Whipped Frosting
This frosting is light, creamy, and not too sweet—perfect for citrus cakes. The trick is to keep everything cold and not over-whip.
Step 1: Whisk the mascarpone
In a stand mixer with the whisk attachment (or a hand mixer), beat cold mascarpone on medium speed for 1 minute, just to loosen it. This ensures that the mascarpone becomes creamy and smooth.
Step 2: Sweeten it up and fluff
Add the powdered sugar and cold heavy cream. Beat on medium-high until soft peaks form, about 1–2 minutes. Stop as soon as you see peaks. Overbeating will turn it grainy.
💡 If you’re decorating in warm weather, refrigerate your bowl and whisk before starting.
🍓 Make the Raspberry Jam
This raspberry jam is quick, fresh, and the perfect tangy-sweet addition between cake layers or as a spoonful on top. You don’t necessarily need to use it, but it definitely makes this cake 10 times better.
Step 1: Start with the berries
Place the raspberries in a small saucepan over medium heat. If you’re using frozen raspberries (which I prefer for cooking), there’s no need to thaw them first.
Step 2: Add the sugar
Sprinkle the granulated sugar over the raspberries and stir gently. Let the mixture cook for about 2–3 minutes, just until the berries begin to release their juices and the sugar starts to dissolve.
Step 3: Make the slurry
In a small bowl, whisk together the cornstarch and water until completely smooth. This mixture will thicken the jam without making it cloudy or overly gelatinous.
Step 4: Thicken the jam
Once the berries are bubbling, pour in the cornstarch slurry while stirring constantly. Continue to cook for another 1–2 minutes, or until the jam thickens and coats the back of a spoon. The color will deepen and it will look glossy and slightly translucent.
Step 5: Add brightness
If you’re using lime juice, stir it in now. This adds a gentle zing and helps preserve that vibrant red color.
Step 6: Cool completely
Remove the pan from heat and let the jam cool to room temperature. For a smoother consistency, you can press the jam through a fine mesh sieve to remove the seeds—but I usually leave them in for a more rustic texture. Chill before using Transfer the jam to a clean jar or bowl, cover, and refrigerate for at least 30–60 minutes. It will continue to thicken as it cools. I recommend it to be a thinner than jam for easier spreading. You can make it up to 5 days ahead and store it in the fridge.
💡 If your cool jam turned out to be thicker than what you wanted, just add some water and thin it down until you reach your desired consistency.
🎂 Assembly & Decoration
Once your cake layers are completely cool, place the first layer on your serving plate or cake board. Spread a generous layer of frosting add some raspberry jam on top and give it a nice swirl. Repeat with the second and third layers, then cover the top with frosting.
I kept mine simple—just a rustic swirl on the sides, a smooth top, and a crown of fresh raspberries, mint leaves, and a few edible flowers I had in my pots. I don’t have a garden… yet. Next year 😉
⚠️ If using fresh raspberries on top, add them right before serving—they mold quickly.
Tips for Success & frequently asked Questions
💧 Keep everything at room temperature (except frosting ingredients).
This helps ingredients combine more evenly and gives you a smoother batter.
🍋 Use fresh citrus juice and zest.
Bottled lime juice lacks the brightness and complexity of fresh. Zest is where all the real flavor is.
🧊 Don’t skip the parchment circles.
This cake is tender and can stick to pans. Parchment makes removal stress-free.
🧁 Want taller layers?
You can double the batter and bake in three 6-inch pans for a taller, celebration-style cake. Just adjust baking time to about 28–32 minutes.
❄️ Can I make it ahead?
Yes! You can bake the layers 1–2 days ahead. Wrap well and store at room temp or freeze up to 2 months. The mascarpone frosting should be made the day you frost the cake.
🍓 Fresh or frozen raspberries?
I prefer using frozen raspberries for both the jam and the cake itself—they’re more affordable, easier to store, and break down beautifully while baking.
When it comes to decorating, I do use fresh raspberries, but as I mentioned earlier, they mold very quickly. One day in the fridge and mine already started to turn. So if you have leftovers, I recommend removing the fresh berries from the top—that way, you can enjoy your cake for a few more days without the worry.
🍬 Now let’s talk vanilla—pure or imitation?
For the frosting, I actually recommend imitation vanilla. I’ve tested this recipe with both, and when I used pure vanilla extract, the frosting absorbed some of that “fridge flavor” overnight. It makes sense, since pure extract contains alcohol, which can carry other odors. But when I used imitation vanilla, the frosting held on to its sweet, clean flavor perfectly.
🍋🟩 Can I use buttermilk instead of the lime juice + milk combo?
Absolutely. The lime juice + milk mix mimics buttermilk and adds that bright, citrusy tang, but if you have buttermilk on hand, feel free to use it as a 1:1 swap. You’re still going to use the lime juice though for that extra layer of citrus aroma. You may add it to the buttermilk or incorporate into the batter when you’re adding the buttermilk and dry ingredients mixture.
🍰 Can I use this frosting for multiple tier cakes?
Short answer is no. I wouldn’t recommend it nor use it on multiple tiered cakes. The frosting is soft and not very stable to keep the weight of many layers. When it comes to multi-tier cakes, stability is crucial. The difference between this frosting and a more traditional buttercream lies in their composition and texture. As soon as you put buttercream in the fridge, it starts to firm up and harden, providing an essential support structure for layered cakes.
In contrast, the base of this particular frosting is whipped cream, which does not firm up in the fridge. This means that it remains soft and can collapse under the weight of additional cake layers. Furthermore, whipped cream is quite sensitive to temperature fluctuations and warm weather. Without proper stabilization, it may start to melt or lose its shape, especially when you have multiple tiers stacked on top of each other.
If you are determined to achieve a multi-tier cake look, I would suggest exploring decorative techniques with firmer frostings or working with stabilized whipped cream, which includes ingredients like gelatin or cornstarch to help maintain structure. However, this recipe does not contain any stabilizers, making it unsuitable for such layered creations. Opting for a more robust frosting will ensure your cake not only looks impressive but also holds its shape throughout your event.

Leave a comment